Linux Hypervisor Setup (libvirt/qemu/kvm)
One of the best things about Linux is how easily you can throw together a few tools and end up with a great system. This is especially true for provisioning VMs. Arguably, this is one of the key things that keeps me on a Linux desktop for my day-to-day work! However, these tools can also be used to turn an old laptop or desktop into a screaming hypervisor. This way you can laugh at all your friends with their $10,000 homelab investment while you're getting all the same goodness on commodity hardware :).
This setup is what I use day-to-day to create Kubernetes environments in a simple, manageable way without too many abstractions getting in my way. If understanding and running VMs on Linuxs hosts interests you, this post is for you!
Tools
KVM, ESXi, Hyper-V, qemu, xen....what's the deal? You're not short of options in this space. My stack, I like to think, is fairly minimal and let's me get everything I need done. The tools are as follows.
key system tools:
These are the key tools/services/features that enable vitalization.
- kvm:
- Kernel-based Virtual Machine
- Kernel module that handles CPU and memory communication
- qemu:
- Quick EMUlator
- Emulates many hardware resources such as disk, network, and USB. While it can emulate CPU, you'll be exposed to qemu/kvm, which delegates concerns like that to the KVM (which is HVM).
- Memory relationship between qemu/kvm is a little more complicated but can be read about here.
- libvirt:
- Exposes a consistent API atop many virtualization technologies. APIs are consumed by client tools for provisioning and managing VMs.
user/client tools:
These tools can be interacted with by users / services.
- virsh
- Command-line tools for communicating with libvirt
- virt-manager
- virt-install
- Helper tools for creating new VM guests.
- Part of the
virt-managerproject.
- virt-viewer
- UI for interacting with VMs via VNC/SPICE.
- Part of the
virt-managerproject.
ancillary system tools:
These tools are used to support the system tools listed above.
dnsmasq: light-weight DNS/DHCP server. Primarily used for allocating IPs to VMs.dhclient: used for DHCP resolution; probably on your distro alreadydmidecode: prints computers SMBIOS table in readable format. Optional dependency, depending on your package manager.ebtables: used for setting up NAT networking the hostbridge-utils: used to create bridge interfaces easily. (tool has been [deprecated since 2016}(https://lwn.net/Articles/703776), but still used)openbsd-netcat: enables remote management over SSH
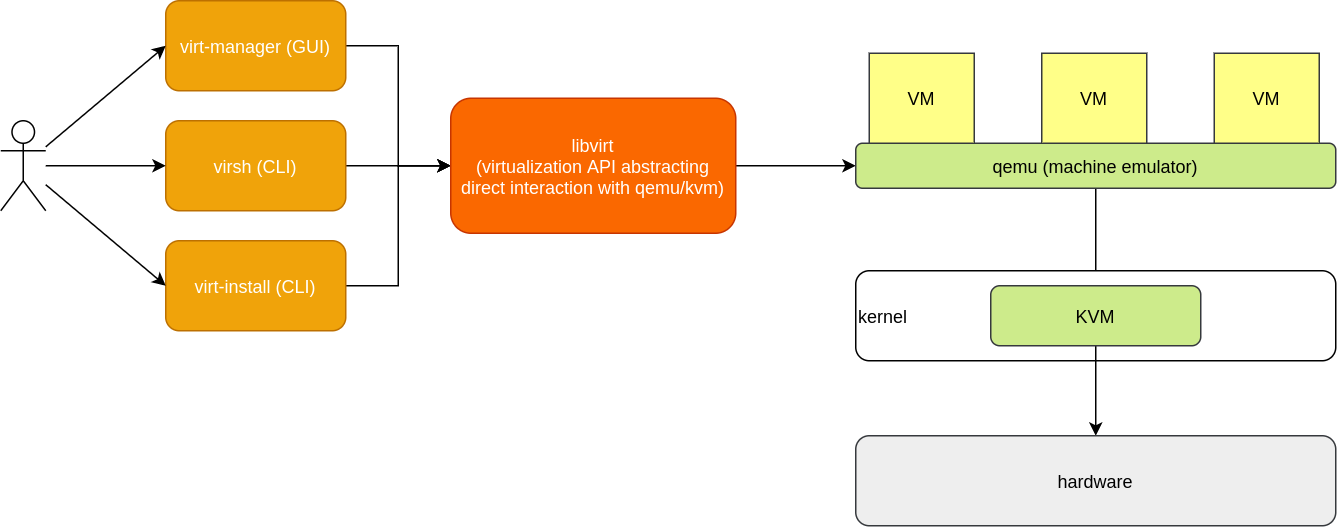
The above may feel overwhelming. But remember it is a look into the guts of all the pieces facilitating the virtualization stack. At a high-level, this diagram demonstrates the key relationships to understand:

How you install these tools depends on your package manager. My hypervisor OS is usually Arch, the following would install the above.
pacman -Sy --needed \
  qemu \
  dhclient \
  openbsd-netcat \
  virt-viewer \
  libvirt \
  dnsmasq \
  dmidecode \
  ebtables \
  virt-install \
  virt-manager \
  bridge-utils
Permissions
The primary tricky bit is getting permissions correct. There are a few key
pieces to configure so your using can interact with qemu:///system. This
enables VMs to run as root, which is generally what you'll want. This is also
the default used by virt-manager. Checkout
this blog post from Colin Robinson, which calls out the
differences.
virsh, will use qemu:///session by default, which means CLI calls not run as
sudo will be looking at a different user. To ensure all client utilities
default to qemu:///system, add the following configuration to your .config
directory.
sudo cp -rv /etc/libvirt/libvirt.conf ~/.config/libvirt/ &&\
sudo chown ${YOURUSER}:${YOURGROUP} ~/.config/libvirt/libvirt.conf
Replace
${YOURUSER}and${YOURGROUP}above.
When using qemu:///system, access is dictated by polkit. Here you have many
options. Since commit
e94979e9015
a libvirt group is included, which will have access to libvirtd. With this in
place, you have the following options.
-
Add your user to the
polkitgroup. -
Be part of an
administratorgroup. In Arch Linux,wheelis one of these groups, in being part ofwheel, you'll be prompted for asudopassword to interact withvirt-managerorvirsh. -
Add your group explicitly to the polkit config. The following example demonstrates adding wheel to
polkit. You will not be prompted for a password when interacting withvirt-managerorvirsh.-
edit
/etc/polkit-1/rules.d/50-libvirt.rules/* Allow users in wheel group to manage the libvirt daemon without authentication */ polkit.addRule(function(action, subject) { if (action.id == "org.libvirt.unix.manage" && subject.isInGroup("wheel")) { return polkit.Result.YES; } });
This is the approach I use.
-
Depending on the option you go with, you may need to re-login or at least
restart libvirtd (see below).
Configure and Start libvirtd
To begin interacting with qemu/kvm you need to start the libvirt daemon.
sudo systemctl start libvirtd
If you want libvirtd to be on at start-up, you can enable it.
sudo systemctl enable libvirtd
This is what I do on dedicated "servers". I don't enable
libvirtdon my desktop machines.
libvirt keeps its files at /var/lib/libvirt/. There are multiple directories
within.
drwxr-xr-x  2 root   root 4096 Apr  4 05:05 boot
drwxr-xr-x  2 root   root 4096 May  6 16:16 dnsmasq
drwxr-xr-x  2 root   root 4096 Apr  4 05:05 filesystems
drwxr-xr-x  2 root   root 4096 May  6 10:52 images
drwxr-xr-x  3 root   root 4096 May  6 09:55 lockd
drwxr-xr-x  2 root   root 4096 Apr  4 05:05 lxc
drwxr-xr-x  2 root   root 4096 Apr  4 05:05 network
drwxr-xr-x 11 nobody kvm  4096 May  6 16:16 qemu
drwxr-xr-x  2 root   root 4096 Apr  4 05:05 swtpm
The images directory is the default location a VM's disk image will be stored
(e.g. qcow2).
I typically keep ISOs locally, unless I've got a PXE flow setup in my network.
To store ISOs, you can create an isos directory in /var/lib/libvirtd.
mkdir /var/lib/libvirt/isos
Create a VM using virt-manager
virt-manager provides an easier way to create a new VM. In this section,
you'll create a new VM from an installation ISO.
-
Download an installation iso to your preferred directory.
sudo wget -P /var/lib/libvirt/isos \
https://mirrors.mit.edu/ubuntu-releases/18.04.4/ubuntu-18.04.4-live-server-amd64.iso
This is the directory created in the last section.
-
Launch
virt-manager. -
Create a new virtual machine.

-
Choose Local install media.

-
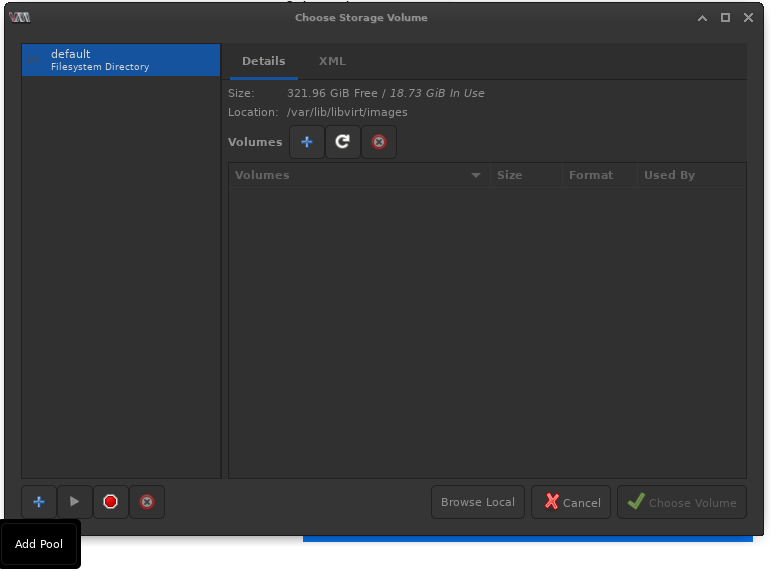
Browse for ISO.
-
Add a new pool.

-
Name the pool
isos. -
Set the Target Path to
/var/lib/libvirt/isos.
-
Click Finish.
-
Select the iso and click Choose Volume.

-
Go through prompts selecting desired system resources.
-
You'll either be prompted to create a default network or choose the default network (NAT).

There are many ways to approach the network. A common approach is to setup a bridge on the host that can act as a virtual switch. However, this is a deeper topic, maybe for another post.
-
Click Finish.
-
Wait for
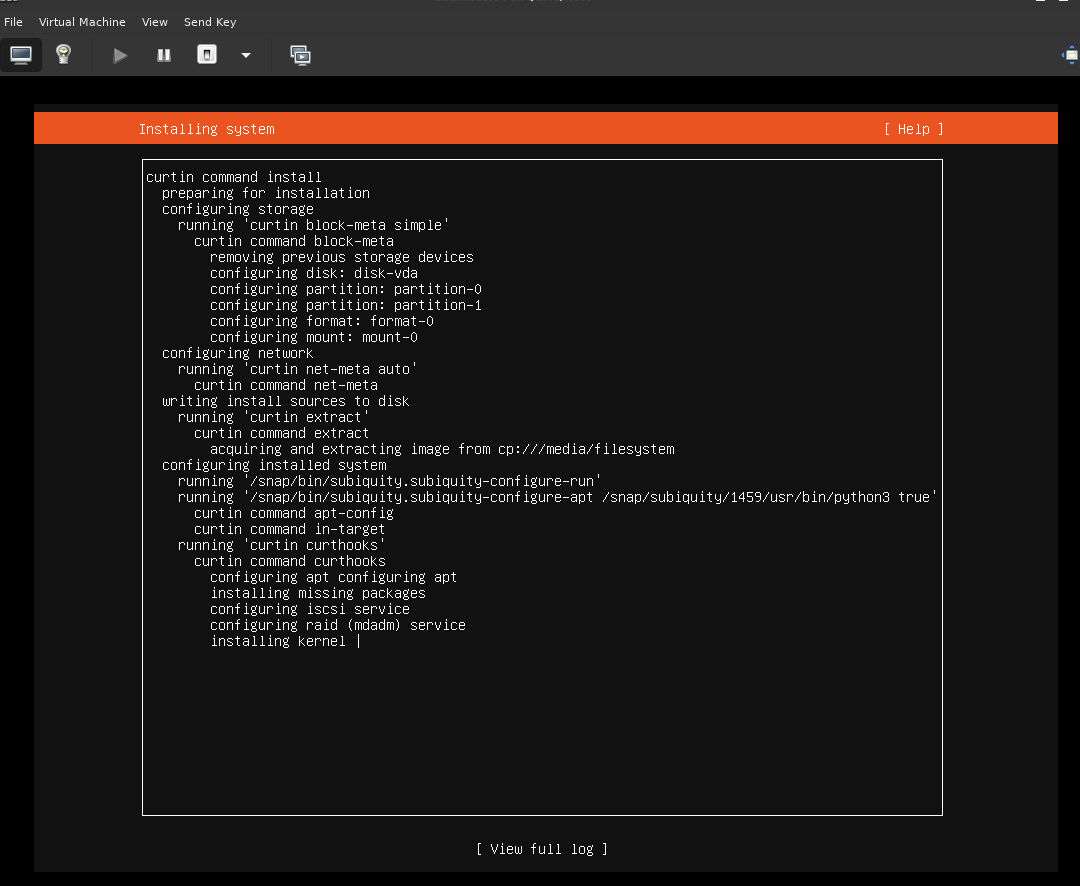
virt-viewerto popup and go through the installation process.
-
Once installed, you can
sshto the guest based on its assigned IP address.
Create a VM using CLI
Following the setup in the previous section, you may wish to trigger the same
install procedure via the command line. This could be done directly with qemu, but to keep interaction like-for-like with virt-manager, I'll show the virt-install CLI.
The equivalent to the above would be:
virt-install \
  --name ubuntu1804 \
  --ram 2048 \
  --disk path=/var/lib/libvirt/images/u19.qcow2,size=8 \
  --vcpus 2 \
  --os-type linux \
  --os-variant generic \
  --console pty,target_type=serial \
  --cdrom /var/lib/libvirt/isos/ubuntu-18.04.4-live-server-amd64.iso
Clone a VM
Cloning a VM could be a simple as replicating the filesystem. Similar to virt-install there is a tool focused on cloning VMs called virt-clone. This tool performs the clone via libvirt ensuring the disk image is copied and the new guest is setup with the same virtual hardware. Often I'll create a "base image" and use virt-clone to stamp out many instances of it. You can run a clone as follows.
virt-clone \
  --original ubuntu18.04 \
  --name cloned-ubuntu \
  --file /var/lib/libvirt/images/cu.qcow2
The value for --original can be found by looking at the existing VM names in virt-manager or running virsh list --all.