VM Networking ( Libvirt / Bridge )
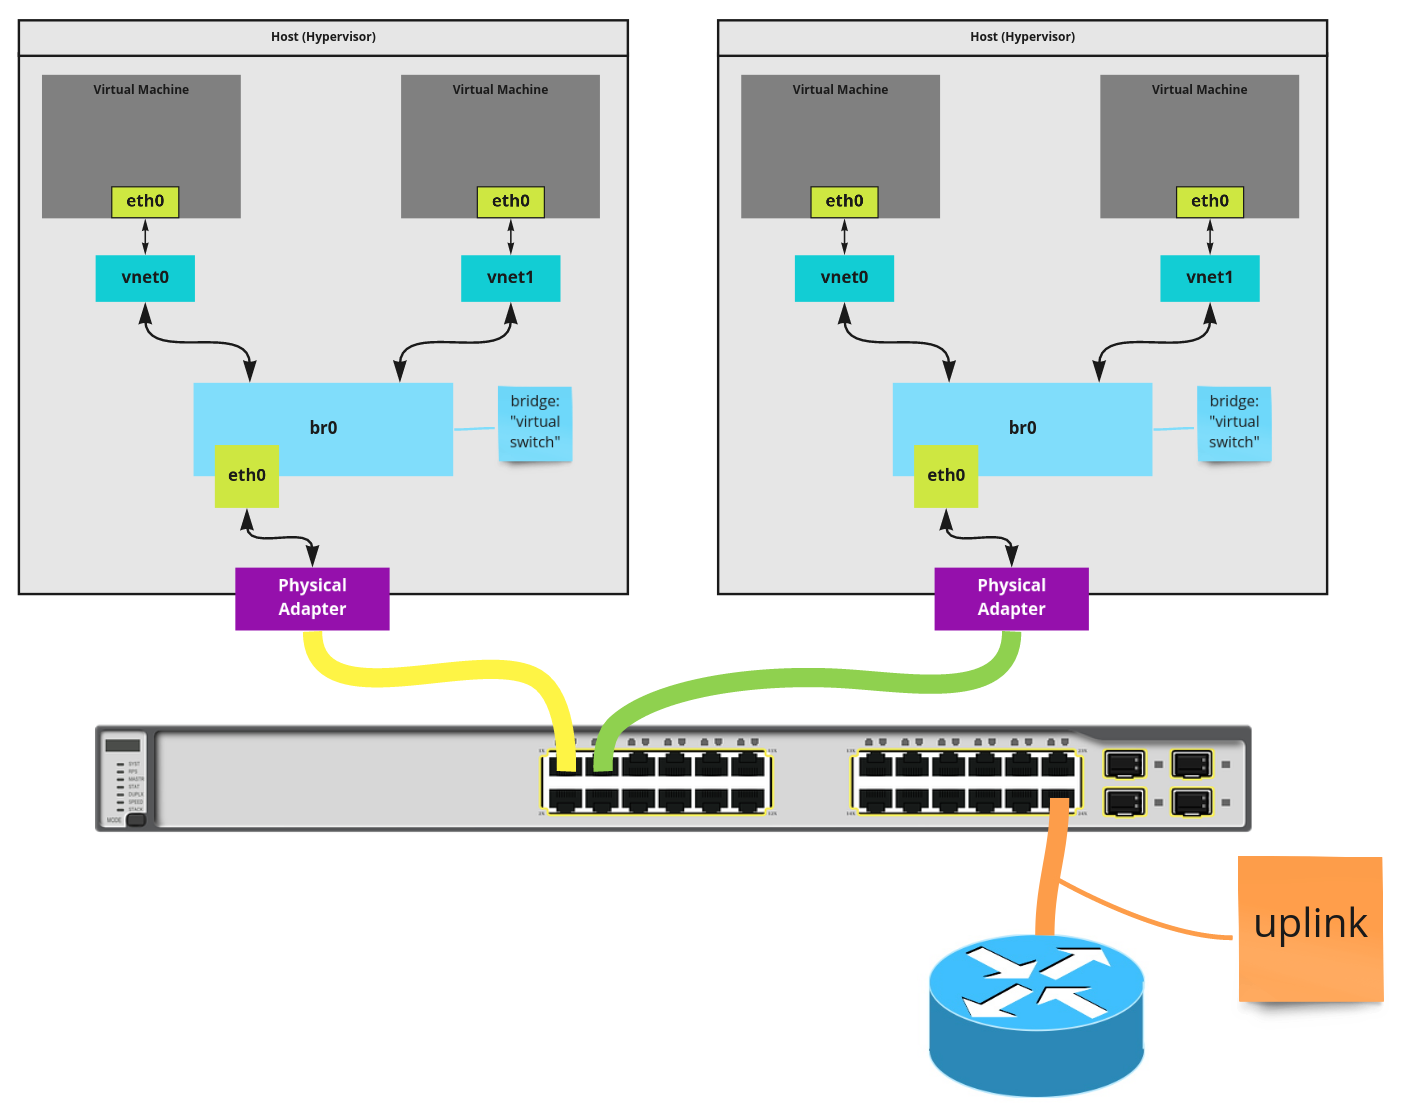
When working with virtual machines via libvirt, it is common to initially spin them up in such a way that allows inter-communication on their host (hypervisor). Namely, VMs can talk to VMs on the same host. However, as you add more hypervisors to your homelab or datacenter, you will likely want VMs to be routable to the larger LAN. Exploring these network models and routability will be the focus of this post.
When using a stack like libvirt/qemu/kvm, there are multiple network models available to you. Libvirt provides a "default" network, which enables VMs to be routable within their host (hypervisor). In order to make VMs routable to the larger LAN, you can introduce a bridge network. This post covers both network models. Additionally, we will examine how to setup a bridge manually, then use systemd-networkd to automate its instantiation.
This post/video assumes basic understanding of the libvirt/qemu/kvm stack. If you do not, checkout my Linux Hypervisor Setup post/video.
Libvirt's Default Network
When the libvirt stack is running, you can use virsh to determine what networks are started.
$ virsh net-list

 Name   State   Autostart   Persistent
----------------------------------------
Your system may already have started the Default network. If not, as is my
case above, you can start it using virsh.
$ virsh net-start default

Network default started
In my case, if I wanted the default network to autostart, I could run virsh net-autostart default. However, as you'll see in a later section, this network
will eventually stay disabled in favor of a bridge network created by me.
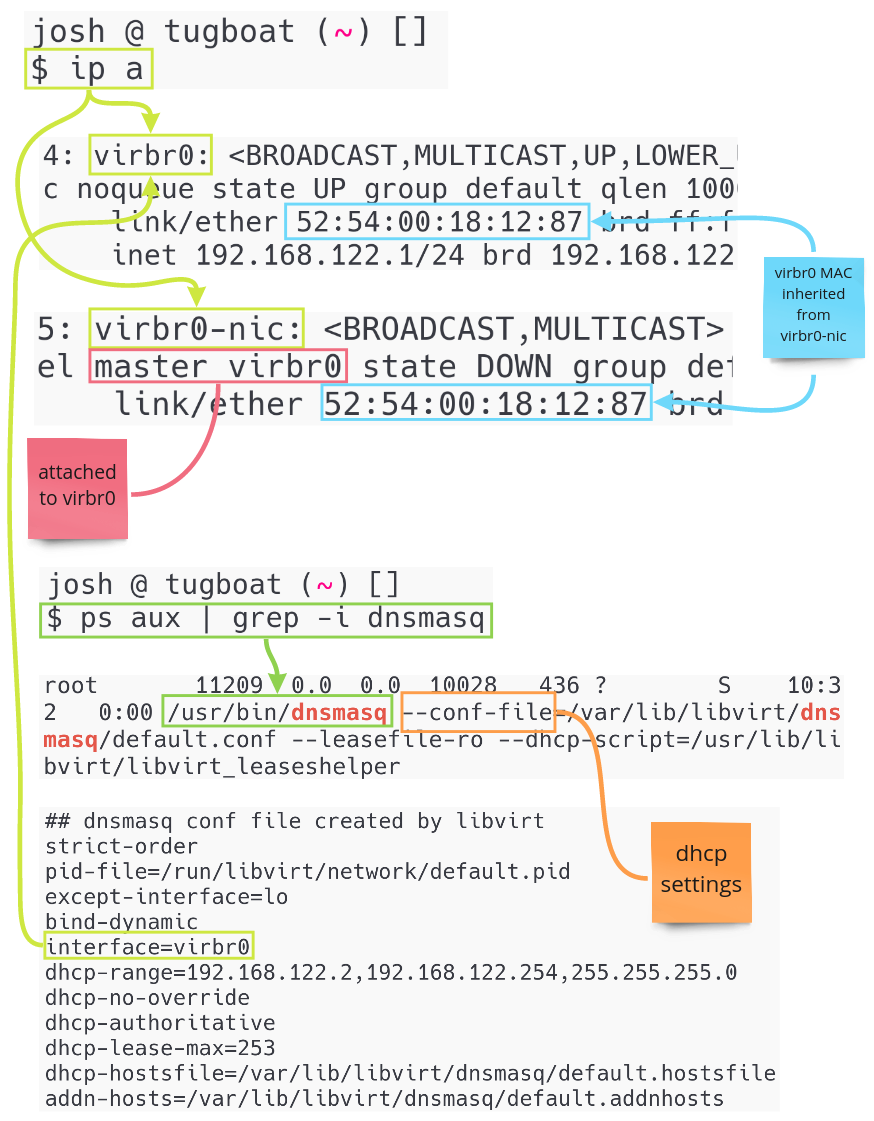
With the Default network started, a few key things have occurred.
- A
virbr0bridge interface was created.- This is a "virtual switch" all VMs are attached to.
- A
virbr0-nicinterface was created and attached to thevirbr0.- This is a dummy interface.
- Its purpose it to give
virbr0a MAC adddress.
dnsmasqwas started.- dnsmasq will work as a local DHCP server.
- The config is at
/var/lib/libvirt/dnsmasq/default.conf.
Visually, these changes and wiring looks as follows.
Now you can start VMs that use the Default network. If you're spinning up new
VMs, assuming you don't modify network settings, it's likely Default will be
used. To check existing VMs, use virsh to validate the network settings.
$ virsh dumpxml octetz2 | grep -i 'network='

<source network='default'
portid='093d03c1-7bb1-45e7-a528-ece5b0e5b47b'
bridge='virbr0'/>
With the VM, in my case octetz2, verified to be using Default, you can start
the VM.
$ virsh start octetz2

Domain octetz2 started
With the VM started, a few key things have occurred.
- A
vnet0tap interface is created and attached tovirbr0.- This interface attached to the
qemu-system-x86_64process. - It enables traffic to flow between the VM to the host's network stack.
- All new VMs get one of these interfaces. The next VM would get
vnet1. - Since
vnet*interfaces are attached to the bridge VMs are routable in the host.
- This interface attached to the
- A new
qemu-system-x86_64process is started for the VM.-
This process is attached to the
vnet0tap interface. -
By identifying a VMs pid and browsing its file descriptor info, you can see this attachment.
$ ps aux | grep -i 'name guest=octetz2'
12562 ... /usr/bin/qemu-system-x86_64 -name guest=octetz2 ...

# cat /proc/12562/fdinfo/32
pos:    90
flags:  0104002
mnt_id: 25
iff:    vnet0
-
- An IP address is leased to the node.
- This lease comes from
dnsmasq.
- This lease comes from
With that, you now have an internal (to the host) VM network! This can be a
great setup when running VMs, that don't need to be reached by external hosts,
on your desktop. Another benefit of managing the entire network through libvirt is
virsh can tell you about the DHCP leases that were made. Assuming a second VM
is launched, the leases may look as follows.
$ virsh net-dhcp-leases default

 Expiry Time           MAC address         Protocol   IP address          Hostname
 ---------------------------------------------------------------------------------
 2020-11-14 13:41:09   52:54:00:2a:22:19   ipv4       192.168.122.4/24    ubuntu-server
 2020-11-14 13:38:54   52:54:00:b9:fe:a5   ipv4       192.168.122.96/24   josh
With the above two VMs running, a high-level look at the network is the following.
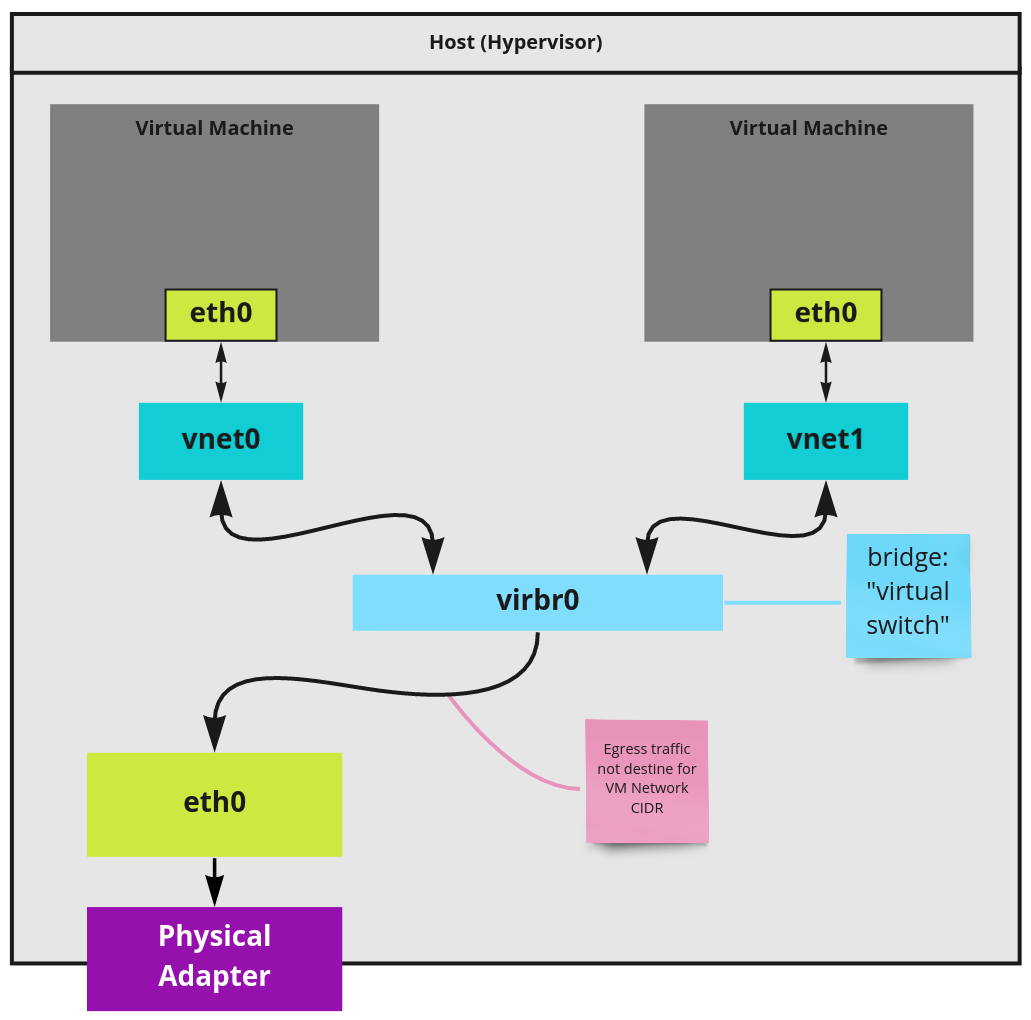
A primary issue with this network layout is the VM network is entirely isolated from the LAN network the host is connected to. If you took the above host and multiplied it, it is likely you'd want VMs, wherever they run, to be able to send traffic to and from each other. I'll tackle this in the next section, Bride Networking.
Bridge Networking
In the previous example, a bridge network was in play. In this next example, you'll be creating a bridge network on the host instead of libvirt. You'll then bind the host's existing interfaces to it. Lastly, you'll configure VMs to attach to this new bridge, as if they are plugging into an internal switch on the host. In this configuration, VMs will be able to respond to ARP requests on the layer 2 segment in effect making them routable to the LAN. In this section you'll walk through each step manually to aid in understanding how this network layout works.
In order to make this network model work, you must ensure the following.
- No network management daemon is enabled.
- Tools like NetworkManager and systemd-networkd should be off.
- They will conflict with this manual configuration.
- Your physical adapter is an ethernet device and not wireless card.
- Wireless drivers will either not support this configuration or will require additional work.
- Your host(s) have no modifications made to their interfaces or route tables.
- Beyond what is autoconfigured for the network hardware detected by Linux.
- I recommend you disable the Default network if you turned it on in the previous section.
- You may consider rebooting your machine to ensure you're starting fresh.
With the above complete, take a look at your existing interfaces to understand where you are starting from.
$ ip a s

1: lo: <LOOPBACK,UP,LOWER_UP> mtu 65536 qdisc noqueue state UNKNOWN group default qlen 1000
    link/loopback 00:00:00:00:00:00 brd 00:00:00:00:00:00
    inet 127.0.0.1/8 scope host lo
       valid_lft forever preferred_lft forever
    inet6 ::1/128 scope host
       valid_lft forever preferred_lft forever

2: eno1: <BROADCAST,MULTICAST> mtu 1500 qdisc noop state DOWN group default qlen 1000
    link/ether 74:d4:35:ed:79:d7 brd ff:ff:ff:ff:ff:ff
    altname enp0s25

3: wlp5s0: <BROADCAST,MULTICAST> mtu 1500 qdisc noop state DOWN group default qlen 1000
    link/ether d8:f2:ca:d5:8c:b6 brd ff:ff:ff:ff:ff:ff
The host I am working with has a ethernet card, represented by eno1, and a
WIFI card (will not be used), represented by wlp5s0. The state of all these
interfaces is DOWN because the machine has just booted and there is no
networking daemon at play. For the following setup, all work will be done with
the ip tool. This is the recommended approach as many other tools, such as
brctl, are deprecated in favor of it.
First you need to establish a virtual switch in the form a bridge interface.
ip link add name br0 type bridge
br0 is now your virtual switch. You want everything, including the host's
ethernet device to "plug" into it. To do this, you'll bind your ethernet
device's interface to br0.
ip link set eno1 master br0
br0 needs an IP address. Normally you'd rely on DHCP to provide this, but I
demonstrate that until the next section. For now, assign an IP to the interface and
setup its broadcast domain (brd). Make sure this IP is not in use elsewhere in
your network.
ip addr add 192.168.4.7/16 dev br0 brd 192.168.255.255
While an IP is in place, br0 and eno1 are still DOWN. Next, change the link
state of both to UP.
ip link set up eno1 &&\
ip link set up br0
Now the interfaces are up. If all went correctly, you can use another host on the LAN and run an arping against the IP address you assigned and verify this host's MAC address responds.
root@some-random-computer [ ~ ]# arping -I eth0 192.168.4.7

ARPING 192.168.4.7 from 192.168.2.91 eth0
Unicast reply from 192.168.4.7 [3A:11:EC:A4:CC:8D]  0.759ms
Unicast reply from 192.168.4.7 [3A:11:EC:A4:CC:8D]  0.816ms
The host is now reachable, however it can't reach outside the LAN. This is because there is default route established for traffic that is outside of 192.168.0.0/16. This can be seen by looking at the route table.
$ route

Kernel IP routing table
Destination     Gateway         Genmask         Flags Metric Ref    Use Iface
192.168.0.0     0.0.0.0         255.255.0.0     U     0      0        0 br0
route -n
Add a route for the default gateway pointed at your router's gateway IP.
route add default gw 192.168.1.1
Now verify your host can ping hosts outside the LAN CIDR.
$ ping google.com

PING google.com (172.217.11.238) 56(84) bytes of data.
64 bytes from den02s01-in-f14.1e100.net (172.217.11.238): icmp_seq=1 ttl=117 time=4.27 ms
64 bytes from den02s01-in-f14.1e100.net (172.217.11.238): icmp_seq=2 ttl=117 time=4.08 ms
With all the current pieces in place, you now have the following components wired up.
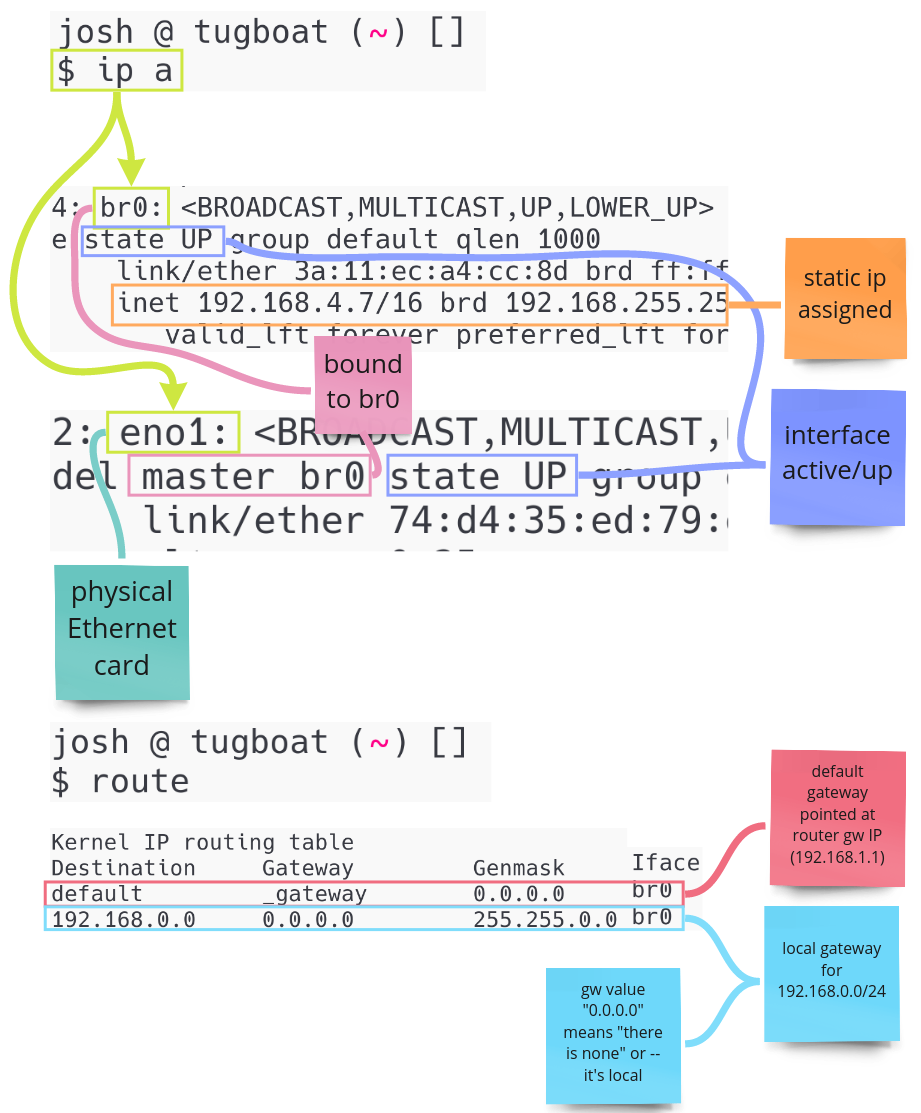
Now you have a bridge network setup that VMs can be attached to! If you are ready to start attaching VMs, skip ahead to the Attaching VMs to the Bridge section. Otherwise, I'll be explaining how to automate this process in the next section.
Automating Bridge Setup
All the work in the previous section was for learning purposes and
realistically you'll want your host configured to automatically setup this
bridge configuration. There are a variety of ways to accomplish this and most
vary based on your distribution. However, most server distributions leverage
systemd-networkd for their networking. By automating the bridge configuration
in systemd-networkd, you can setup a process that is portable across most
distributions.
First, you should create the file /etc/systemd/network/br.netdev and set it up
to create the same interface we did in the previous section.
# file is /etc/systemd/network/br.netdev

[NetDev]
Name=br0
Kind=bridge
Next you must create /etc/systemd/network/1-br0-bind.network instructing
the ethernet interface to bind to the bridge.
# file is 1-br0-bind.network

[Match]
Name=eno1

[Network]
Bridge=br0
Lastly create /etc/systemd/network/2-br0-dhcp.network instructing
systemd-networkd to do a DHCP look, providing br0 an IP lease.
# file is /etc/systemd/network/2-br0-dhcp.network

[Match]
Name=br0

[Network]
DHCP=ipv4
I prefer to label the .network files with a number because they are
lexicographically evaluated and you want the ethernet interface to be bound before
requesting a DHCP lease. However, I am not sure what the behavior would be if
these were evaluated in the wrong order.
To make this changes take effect, enable the systemd-networkd unit, which
ensures it launches at start up.
systemctl enable systemd-networkd
After the machine re-starts, you can verify all the pieces are in place. See the final image of the last section for reference.
Attaching VMs to the Bridge
From this point on, VMs can be created on the host without starting the
Default network. Instead, simply start VMs and specify the bridge interface
you want to attach them to.
virt-install \
  --name testvm \
  --ram 2048 \
  --disk path=/var/lib/libvirt/images/u19.qcow2,size=8 \
  --vcpus 2 \
  --os-type linux \
  --os-variant generic \
  --console pty,target_type=serial \
  --bridge=br0 \
  --cdrom /var/lib/libvirt/isos/ubuntu-18.04.4-live-server-amd64.iso
If you have a fancy managed switch, you can likely log into its management panel and see that on a single port the hypervisor and VMs are both seen as unique MAC addresses.
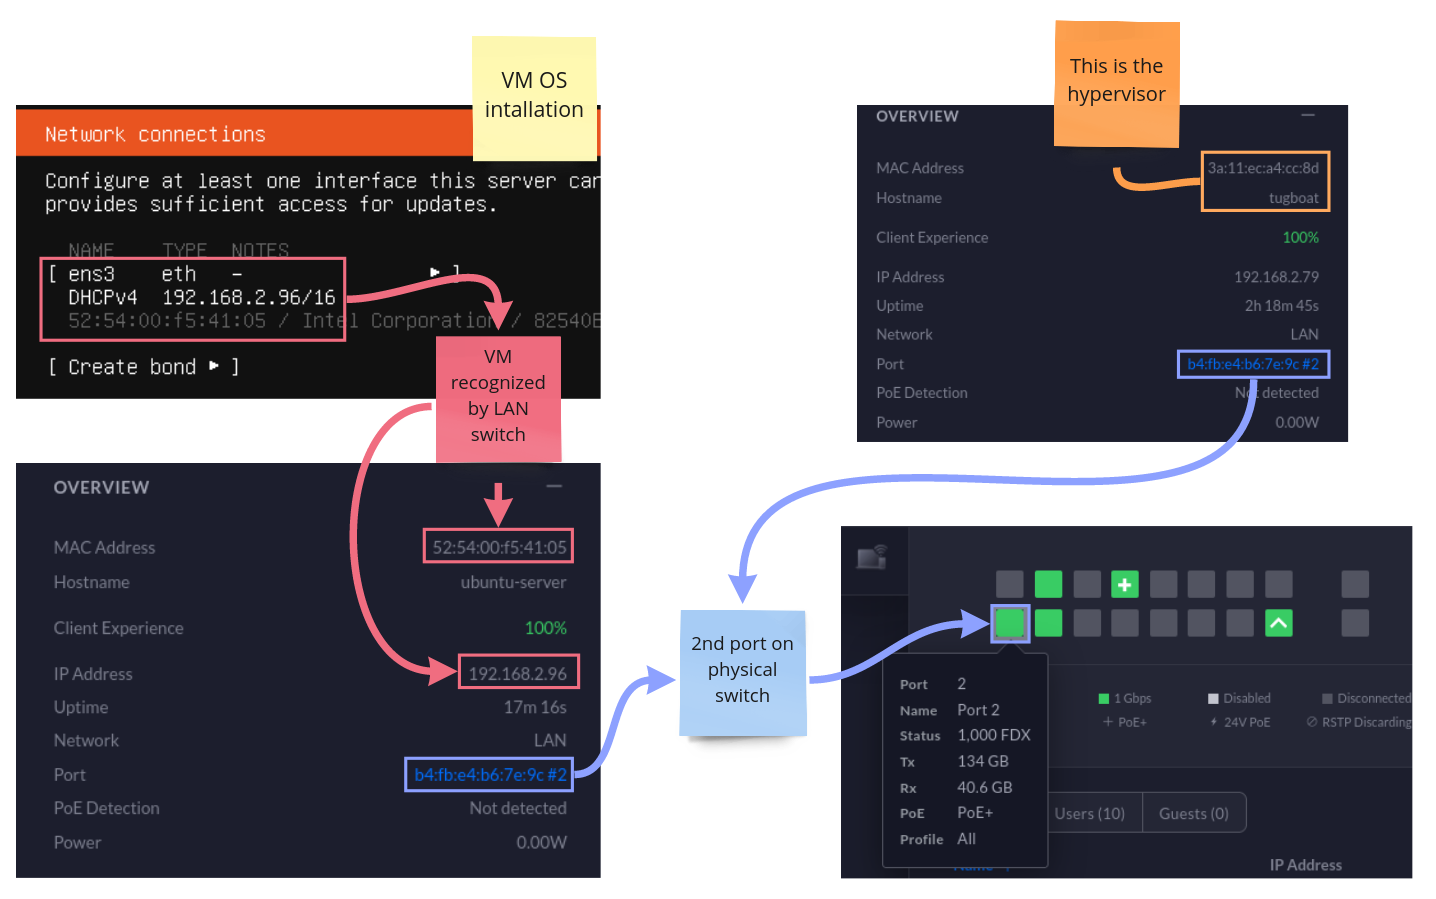
Now that everything is wired together, you now have a network setup that looks as follows.
